In 2011 I swore off traditional clothing shopping b/c i wanted to 1-get out of debt and 2-learn to sew and explore my fashion creativity. I chose a sweater because baby its cold outside!! I found a sweater I wanted to redo, from a thrift store. And wow was it a beauty. Not only was it big but it was there was a slight discoloration so its got to get covered with something.
Take a look at this cardigan... (the Before pic!)

Yeah there isn't much to say about it other than the color was really pretty! I love this teal color.
Now it is a women's size large caridgan. Again way too big. Too long in the length and too long in the sleeve length. Too big in general. Time to cut it up!
I first deicded the elastic bands around the sleeves and the waist (can you really call it a waist- no woman deserves it regardless of what size or shape you are!). Cut cut-buh bye!

Wow it already looks better!
Now i used another cheat to take in this cardigan, sorry i thought i had a picture of this but maybe my cat ate it :) I turned it inside out and used my good old sharpie to trace an outline. I left room for a seam allowance. :) Pin. And sew! I tried it on and yay it worked! LOL I still don't know why i am so excited that I can alter. Maybe its b/c I have really never altered before. And I am suprised it is working.
Moving along. I still needed the length to be taken up (but at least the elastic band is gone). Turned the cardi inside out and put it on myself. I decided where i wanted the length to be and I pinned up the hem. Warning doing the backside by yourself can be a bit of a challenge. But at least i got monkey arms on my side, nevertheless, I still got pins in my bum. :(
Sewed the hem up. Tho the part where the button and the hole meet i did not finish since I have to make sure i don't loose the hole. I will work on that later.
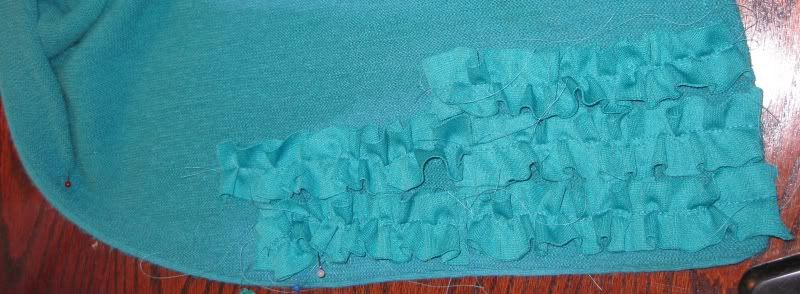
Now to the fun part. Here is where I get a point for using material from my stock. I had some remnants of teal fabric, wonderful polyester. But it will work perfectly for what I want to do next. Now its time to practice some ruffling! I had several sequares of this polyester. I cut 1.5 inch strips using my rotary cutter (which i love!). Then down the center of each strip I sewed down using the longest stitch of my machine on a 0 tension. Once that was done I pulled the bobbin thread and we have ruffles.

I began to pin to each ruffle to the cardigan. Then just sewed down the center to anchor it on to the sweater. I did not have anything in particular in mind I just wanted vertical ruffles. After adding a few i decided to go all the way up the sweater.
WARNING NOTE: if you plan on buttoning the cardigan (rather than keeping it open) and if its a V-style cardi like mine. a straight line laying flat is a diagonal line on your body. I learned that the hard way. So I removed the suspect pieces and added it while i was wearing the cardi. Which is fun, I pinned myself so many times my poor chest!
Here is the end product!!! I love my new cardi! Its great for work! Sorry you don't get the finished shot of me 1- b/c i was having a bad hair day and 2- my boyfriend wasn't home to take a pic. maybe one day...


with a belt.. don't know if i like this belt or not!

Yay this was seriously a LOT of fun! Who would have known the frumpy cardigan could turn into something so fabulous!
My only beef was I wish I had a ruffler foot! Now I will just bug Sonja to use hers until I get my own :)
Ok stay tuned I have more refashions coming along in the pile! :)