Well hi welcome to my little blog. Just my little corner of craftiness, sewing, and refashioning. I am also a newly gluten free eater so you have a little bit of recipes mixed in here.

Tuesday, January 31, 2012

DIY laundry detergent

Ok so here I am jumping on the bandwagon! But let's see I am fully determined to get out of debt and reduce my costs here at home. One of the expenses that is just huge is laundry detergent. I wash a lot! I saw this on one of my fellow refashion co-op editor's blog and thought I would give it a try! It is a non-borax powdered detergent. Here is what you need...


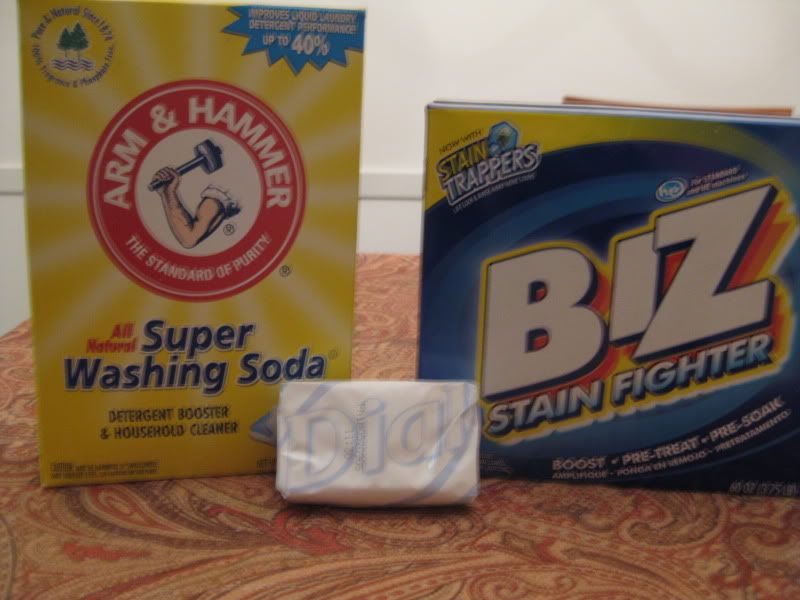
1 box of biz boost/stain booster (in place of borax)
1 box washing soda
1 bar of dial soap (or another soap with no lotion added!)
cheese grater
food processor

all of the ingredients cost right under $10 total. I had a cheese grater and I borrowed Sonja's food processor.

Here's how to do it
1. grate your bar of soap with the cheese grater. This is the longest part, I did this while watching a show on tv, balancing on my ball trying to strengthen my core.

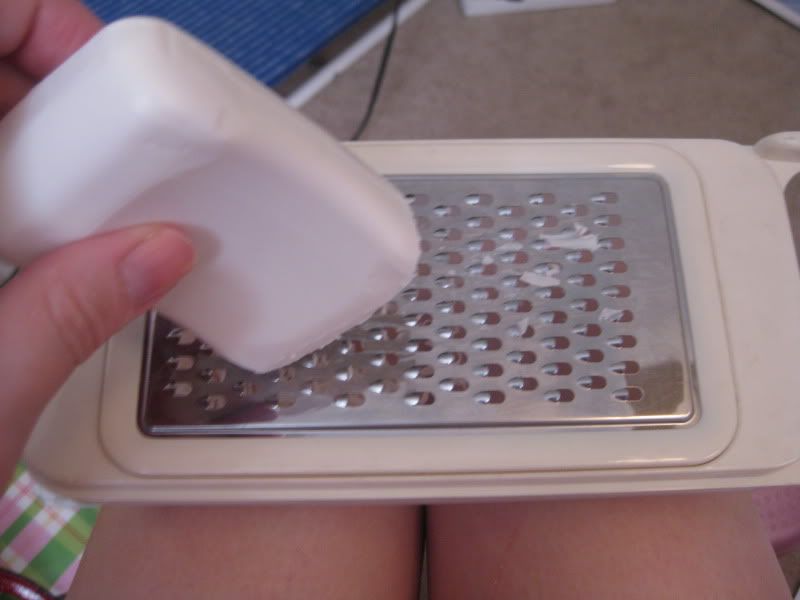
Towards the end your grater may look like this...

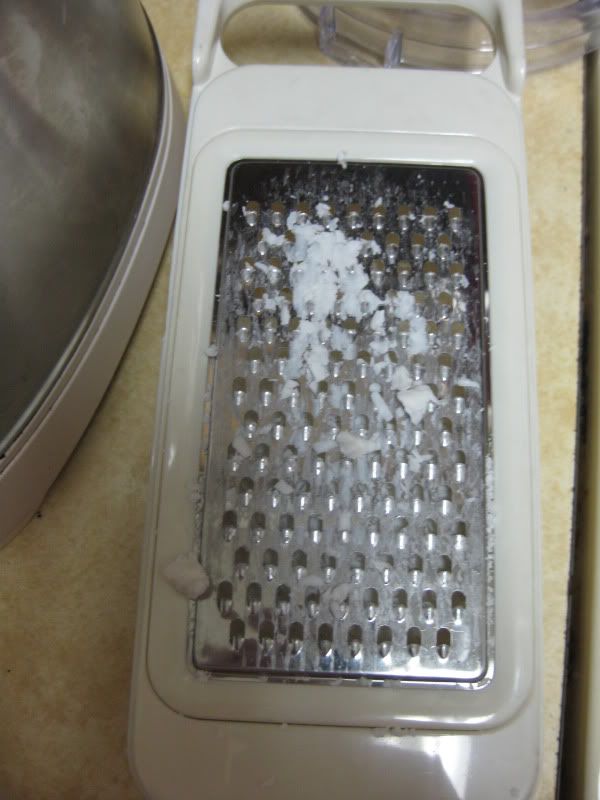
but you have nicely shredded soap.

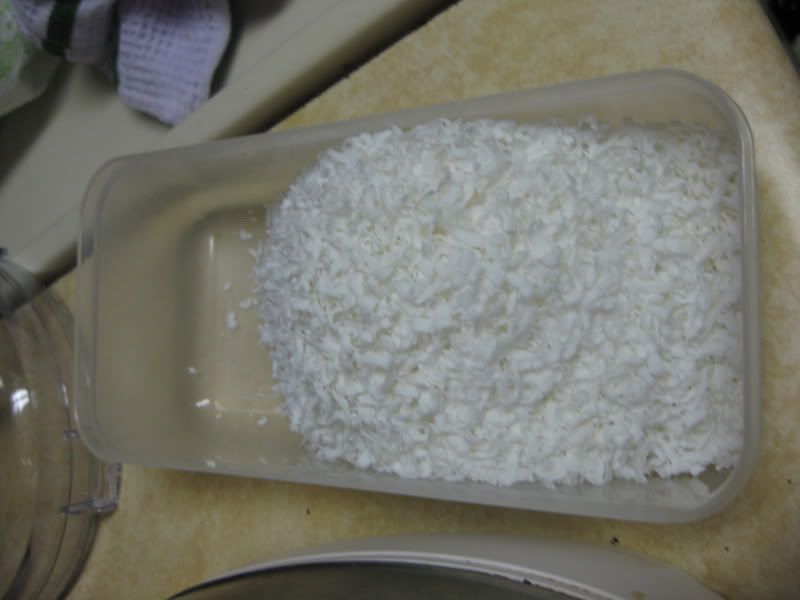
2. Combine with biz and some of the washing soda in the food processor to further grate into a powder.

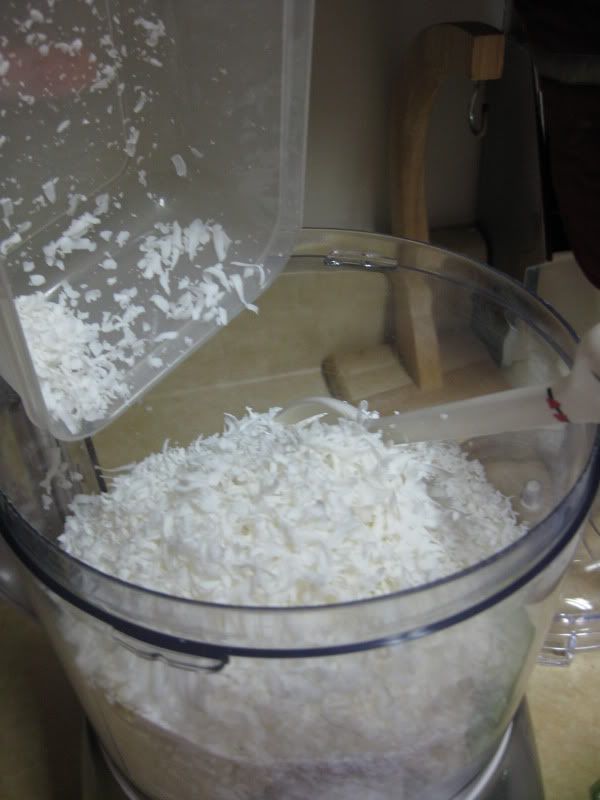
Running... oooooh ahhhhhh

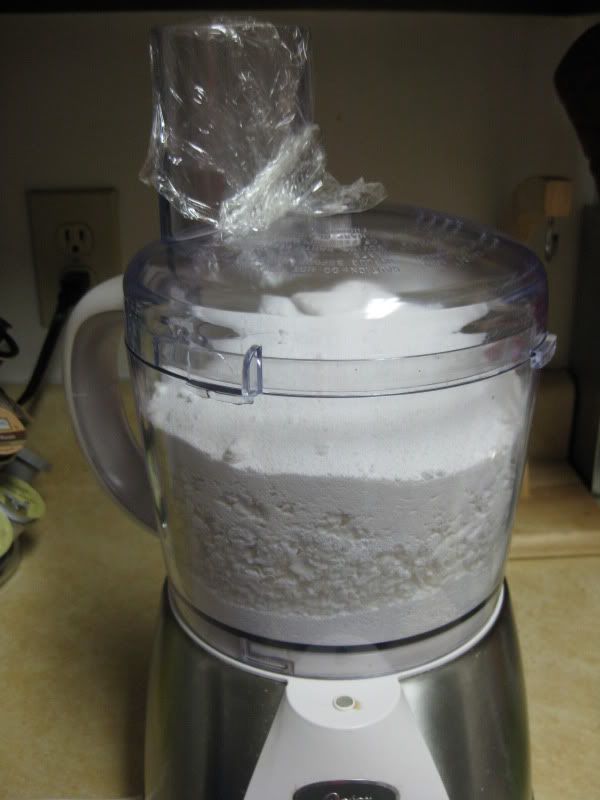
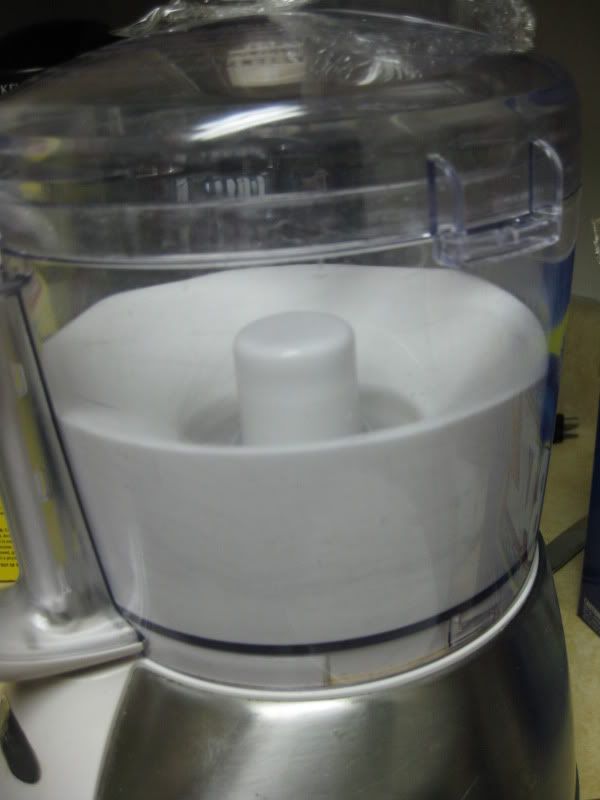
Continue with processing the remainder of the ingredients. Done!

I had a small roasting pan worth of detergent! Holy cow!

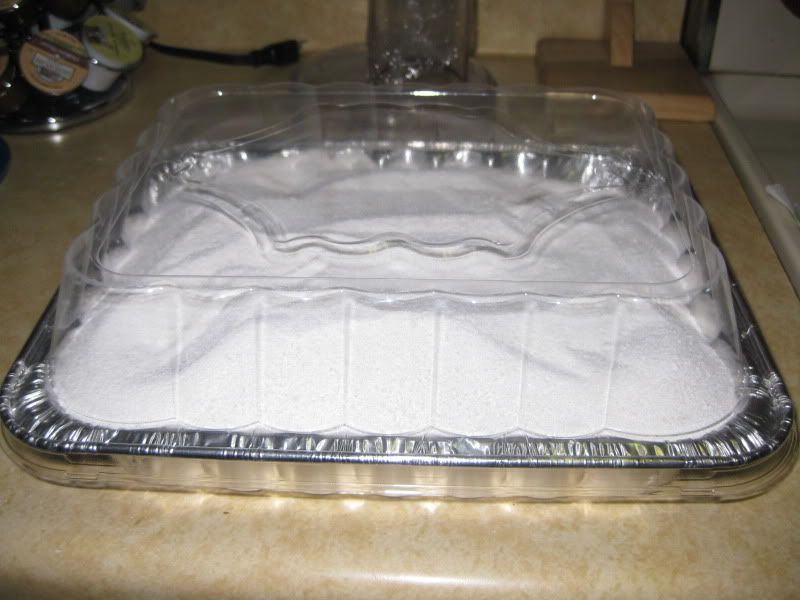
This was the only thing I could find to hold it! Will look for a more permanent container for the future.

So here is the kicker you only need 3 tablespoons for an extra large load! Seriously! Scale down from there. I have tried it and my clothes smell fresh, have come out so clean and bright, you could not even tell it wasn't the expensive store brand stuff!

I think that I probably won't have to buy detergent for the rest of the year. Wahoo!!!

xoxoxoxo,
Lauren

Monday, January 30, 2012

Iron Craft #2- Jeweled necklaces and bracelets

Apparently I am on a jewelry kick lately. I have been trying to put a dent in my bead stash.

Iron Craft is now kicking off it's second year in the making and I'm quite excited! This year challenges are 2 weeks long rather than 1. Personally, so far I have slacked off instead! So I am hoping maybe things calm down here and I'll make grander things. Until then, at least I did something for this week's challenge... Hearts and flowers. It is a semi-valentines day theme. I went back and forth with what I was going to make and opted to make a necklace. This weekend I am going to be in a Mardi gras parade and I wanted a necklace to match my skirt and bra/belt set. It is my midnight madness set and we are wearing red skirts. I have a few of my beads leftover from my drapes so I mixed it up with some red beads and capped it off with a vitrail medium large heart crystal pendant.


Pretty simple but matches my costume ensemble perfectly. Can't wait to wear it.

I did not stop there, while I had the beads out I made another vitrail medium (totally unrelated to this challenge!)

And then 2 elastic bracelets. I have small wrists and sometimes I don't like a lot of bracelet movement so I love elastic!

Of course none of the pictures do them justice. They are all mostly crystal and just sparkle intensely. I just need to master how to take jewelry pictures. I so need a lightbox. Oh yeah and +6 jewelry points for me! Wahoo (also counts as 6 bling points-oh yeah). Here's to putting a dent in my stash!

xoxoxo,
Lauren

Thursday, January 19, 2012

My new dress form!

So I was a good girl this year because Santa brought me a dressform for Christmas!

It killed me, I mean killed me to not open it up in South Florida and play with it! I had to sit and wait to come home to Mobile to open it! Gah!

I was so excited to open it up when we made it back to Mobile. There wasn't a lot of parts and pieces so that was nice. It took me some time fiddling with it to get my measurements right. I am not completely sure everything is correct but it is real close.


I did make a duct tape dress for but that got ruined with the Old Spice Captain Costume. I had a ton of fun making it with my parents.

We actually duct-taped my dad's mouth shut. It just seemed approrpiate. LOL.

But I am so excited about having a dress form. I have just started using it and it is great for when I was to try something out and then I can sit and see how it looks and decided if it is a YAY or NAY!

Here's to using my dressform more in 2012! :)

xoxoxox,
Lauren

Wednesday, January 18, 2012

The pink patchwork bellydance costume is finished!

So last night I posted how I made beaded fringe for my pink patchwork costume. Now I can show you the journey that went into making this costume!

Let me back up first, on how it all started. I only started to sew and make my own costumes for less than 2 years. I mean I fixed a fringe, loose sequins, bra straps, etc. But I never really designed a costume from the start. This one was the first one that literally came to mind when I woke up one morning. The night before I was going through and organizing my bead stash (I still do this all the time b/c I have a lot of things). Suddenly I realized what I wanted to do was make a patchwork using sequins an then fill in with beads and sequins. Use what I already have!

I started off with using a pink sating and covered a bra and belt. Then I laid out the grid work with the pink iridescent sequins I had on a spool.

I decided I was going to use the following colors: light pink, dark pink, silver and gold. I was going to interchange between sequins and just beads. I started on the belt first

I loved the pattern once I got it.

So I finished the belt

Next to the bra!

I finished the bra

I finsihed beading actually in one weekend. Yes really. It flew so fast.

So I was left with this gorgeous costume but it needed to be finished. This is where I got stuck. I didn't know how to finish it with fringe, etc. Then we moved into our bigger apartment, I started a new job. I began refashioning and I got the 60 boxes of fabric that is now my fabric stash.

At the beginning of the year I decided I was ready to finish it. And I was ready to bead my own fringe. I won't go into details because that was another post see here

Now here is how I finished it. First I laid the fringe on the bottom of the belt.

Next time to whip stitch it down to the belt.

Done!

From the front.

Time to line! I lay mine down and cut away with some scissors.

Start at one end, fold under and pin.

Whip stitch down

It gets a little tricky around the fringe. I did cut it some to take out the strain of the fabric.

Here is me covering the bra, which i forgot to take pictures of... but I do have one.

And the finished product... :) All done

Now I can cross off a costume on my list. Now I need a place to wear it! :)

xoxoxo,
Lauren

Pink shirt makeover

Whew it has been a long day. I woke up early bright eyed and bushy tailed ready to get to work and conquer all. As I was packing my bag, I had a sharp pain in my stomach. Didn't think much of it but thought I was going to be fine. Long story short, I never made it into work. I had what felt like 5 bowling balls bouncing around in my stomach with the weirdest noise ever. I am finally keeping food in and I am finally feeling somewhat stronger. I am able to sit it now and thought I would finish catching up on some of my projects.


I thrifted this shirt while I was visiting my family in Florida. The shirt was in great shape and would be great for work but I hated the color. I thought I would dye it and make it better. :) It was polyester/nylon mix so I had to go to iDYE (which btw is now available in some stores! exciting news!) I had blue and purple. I opted for purple, I mean violet, b/c the and violet would just make a purple and I could live with that!

What I did not expect was the outcome! Holy cow! I was in love with this color!

What I could not get the camera to pick up was the color, it is actually much richer and jewel tone than my camera can pick up. I tried different lighting and no luck. I can't switch my camera's color mode either. It was enough for my boyfriend to go wow! He then spent the rest of the night dyeing his plastic disc golf discs which came out awesome!
What I love is the beads which were clear really stand out on the purple. I honestly did't know they exsisted until after I was done dyeing!

Sometimes all you need is some change of color!

XOXOXOXO,
Lauren

Dyed Cardigan Take 2

This is take 2 b/c my first dyeing attempt on a white cardigan left me an electric tangerine cardigan, now given to Sonja to refashion into an item. When she is done I'll post it. Until then I'll start with take #2!

So another boring white cardigan. I wanted a mustard/beige cardigan to go with more items for work. This time I decided to try a Acid dye from Dharma trading. Yes I was slightly scared too when I first read it but thought I would give it a try.

I used their Honey mustard. I didn't weight the powder out, I just slopped it into the pot! LOL. Heated it up and made sure it was in solution (which I probably added too much b/c I did get some chunks but it actually didn't affect the dyeing process) washed my cardigan and mixed the two. The directions then called for adding vinegar. Luckly the boyfriend wasn't home and it didn't smell as bad as I thought it would. Instantly we had emulsification!


The end product.... a nice beige cardigan for work.

I am the cardigan queen! LOL! Much better than the stark white bland cardigan.

Tuesday, January 17, 2012

DIY bellydance beaded fringe

I am almost done with my Pink patchwork bellydance costume. The reason it has taken me so long is b/c I did not know how I wanted to fringe it. There was no place online that matched the color in my costume. I wanted light pink.

So my only option??? Make my own! Eek! and hence why this project sat on my shelf in a bag. For a year... until now. I was ready to tackle this project and finish it this year!

First I started off with some simple seed beads. Purchased from Michael's. Then I got some plain rope that someone would use for like a children's craft and that was going to be my base to support my fringe. There was no way I was beading each strand to the bottom of the belt! No way!

So I came up with this crazy getup that I could bead with my hands free and the rope would not twist. I used my fabric covered cardboard block and I pinned the rope to the blocks and began to sew.

After my first string!

So I knotted each string before I went to the next string. Basically, each string was double threaded, I went through the top of the rope, down 5 inches, added a bigger bead that corresponded to the beads already on the costume. Then I rewove the needle up through the seed beads back up to the rope. Knot again.


Then I kept going! Here is during the beading. I moved the rope with the beaded fringe as I went so it wouldn't hang and get too heavy. Then it was easier to keep my length correct. :)

Then I was done. Stay tuned for the next post on finishing the actual costume! :)

XOXOXOXO,
Lauren

LinkWithin

Related Posts Plugin for WordPress, Blogger...